As a PhD student in Deep Learning, as well as running my own consultancy, building machine learning products for clients I’m used to working in the cloud and will keep doing so for production-oriented systems/algorithms. There are however huge drawbacks to cloud-based systems for more research oriented tasks where you mainly want to try out various algorithms and architectures, to iterate and move fast. To make this possible I decided to custom design and build my own system specifically tailored for Deep Learning, stacked full with GPUs. This turned out both more easy and more difficult than I imagined. In what follows I will share my “adventure” with you. I hope it will be useful for both novel and established Deep Learning practitioners.
If you’re like me, and working day (and night) with practical machine learning applications, you know the pain of not having the right hardware for the task at hand. Whether you’re working in industry or academia, nothing is more annoying than having to wait longer than necessary for the results of an experiment or calculation to come in. Fast hardware is a must for productive research and development, and GPUs are often the main bottleneck, especially so for Deep Neural Nets (DNNs).
Yes, it’s true: Cloud providers like Amazon offer GPU capable instances for under $1/h and production-ready virtual machines can be exported, shared, and reused. If installing libraries from scratch is more your thing, you probably know that both software and hardware libraries can easily be installed with regularly updated install scripts or dockerized containers. So far so good. What however about the kinds of applications which need more than the 4GB GPUs Amazon offers (even their newest g2.8xlarge still offers the same 4GB GPUs, be it x4)? The few other cloud providers offering bigger GPU’s (6GB generally) all seem to be either too custom tailored for very specific applications (video edition or biosci), or just completely unusable.
So what is one to do? Simple: get your own GPU rig!
Overview
Know your stuff: Research
Once I decided it was time to get my own GPU system I first thought: why go through the hassle of building one yourself, hasn’t Nvidia just released its glorious DevBox, and might there not be other vendors doing the same for Deep Learning applications? Well yes it turns out there are some other companies building research-oriented machines, but none of them ships or sells to Europe. Nvidia’s Devbox also only ships to the USA, next to being ridiculously overpriced (with its $15k for around $9k of hardware components), as well as has a huge waiting list.
Again, what is one to do? Simple: build you’re own GPU rig!
Starting out: Choosing the right components
Surfing the web, I found Tim Dettmers’ blog where he has a couple of hugely useful posts on which GPU’s and hardware to choose for Deep Learning applications. I won’t repeat this information in full here. Just go and check them out! Both the posts and the comments are very much worth to take a look at.
In short:
- Double precision (as Nvidia’s Tesla K20/40/80 offer) is a waste of money as this type of precision is not needed for DNNs;
- Think of how many GPUs you might want to have, now and in the future. Four GPUs is the max as anything more will not really give much performance benefits anymore. This is mainly because the best motherboards can only support a maximum of 40 lanes (with a 16x8x8x8 configuration). Furthermore, every GPU adds a certain amount of overhead, where your system has to decide which GPU to use for which task;
- Get a motherboard which supports PCIe 3.0 and supports PCIe power connectors of 8pin + 6pin with one cable, so you can add up to 4 GPUs. The motherboard should be able to support your GPU configuration, ie enough physicial lanes to support a x8/x8/x8/x8 setup for 4 GPUs;
- Get a chassis with enough space for everything. Bigger chassis offer more airflow. Make sure there are enough PCIe slots to support all the GPUs, as well as possibly any other PCIE cards you might install (as fast Gigabit network cards or whatever). One GPUs typically takes the space of 2 PCIe slots. In a typical chassis this means 7 PCIe slots, as the last GPU can be mounted at the bottom using only one slot;
- CPU’s don’t have to be super fast and don’t have to have a massive amount of cores. Just make sure you get at least as many cores as you might have GPUs, again now and in the future (Intel CPUs generally have 2 threads for each 1 core). Also make sure the CPU supports 40 PCIe lanes, some new Haswell CPUs only support 32;
- Get twice the amount of RAM as your total GPU memory;
- SSD is nice but only an absolute necessity if you load datasets which don’t fit into GPU memory and RAM combined. If you do get an SSD, get at least one larger than your largest dataset;
- As for ordinary mechanical hard disks, you might want to get plenty of disk space to store all your datasets and other types of data. RAID5 is nice if you have at least 3 disks of the same size. Basically upon failure of a single drive you won’t lose your data. Other RAID configurations like RAID0 for performance boost usually not of much use: You have SSDs for speed, and these are already faster than your GPU can load data from them through its PCIE bandwidth;
- As for the Power Supply Unit (PSU) get one with as high efficiency as you can afford to, and take into account the total wattage you might need - again - now and in the future: Titanium or platinum quality PSUs are worth the money: you will save money and the environment, and get back the extra $$ in no time on saved energy costs. 1500 to 1600 Watt is what you probably need for a 4 GPU system;
- Cooling is super important, as it affects both performance and noise. You want to keep the temperature of a GPU at all times below 80 degrees. Anything higher will make the unit lower its voltage and take a hit in performance. Furthermore, too hot temperatures will wear out your GPU; Something you’d probably want to avoid. As for cooling there are two main options: Air cooling (Fans), or Water cooling (pipes):
- Air cooling is cheaper, simple to install and maintain, but does make a hell lot of noise;
- Water cooling is more expensive, tough to install correctly, but does not make any noise, and cools the components attached to the water cooling system much much better. You would want some chassis fans anyway to keep all the other parts cool, so you’d still have some noise, but less than with a fully air cooled system.
Putting it all together
In the end, after thorough reading, helpful replies from Tim Dettmers, and also going over Nvidia’s DevBox and Gamer Forums, the components I chose to put together. It is clear that the machine is partly (at least the chassis is) inspired by Nvidia’s DevBox, but for almost 1/2 of the price.
- Chassis: Carbide Air 540 High Airflow ATX Cube
- Motherboard: Asus X99-E WS workstation class motherboard with 4-way PCI-E Gen3 x16 support
- RAM: 64GB DDR4 Kingston 2133Mhz (8x8GB)
- CPU: Intel(Haswell-e) Core i7 5930K (6 Core 3.5GHz)
- GPUs: 3 x NVIDIA GTX TITAN-X 12GB
- HDD: 3 X 3TB WD Red in RAID5 configuration
- SSD: 2 X 500GB SSD Samsung EVO 850
- PSU: Corsair AX1500i (1500Watt) 80 Plus Titanium (94% energy efficiency)
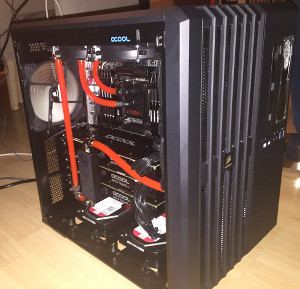
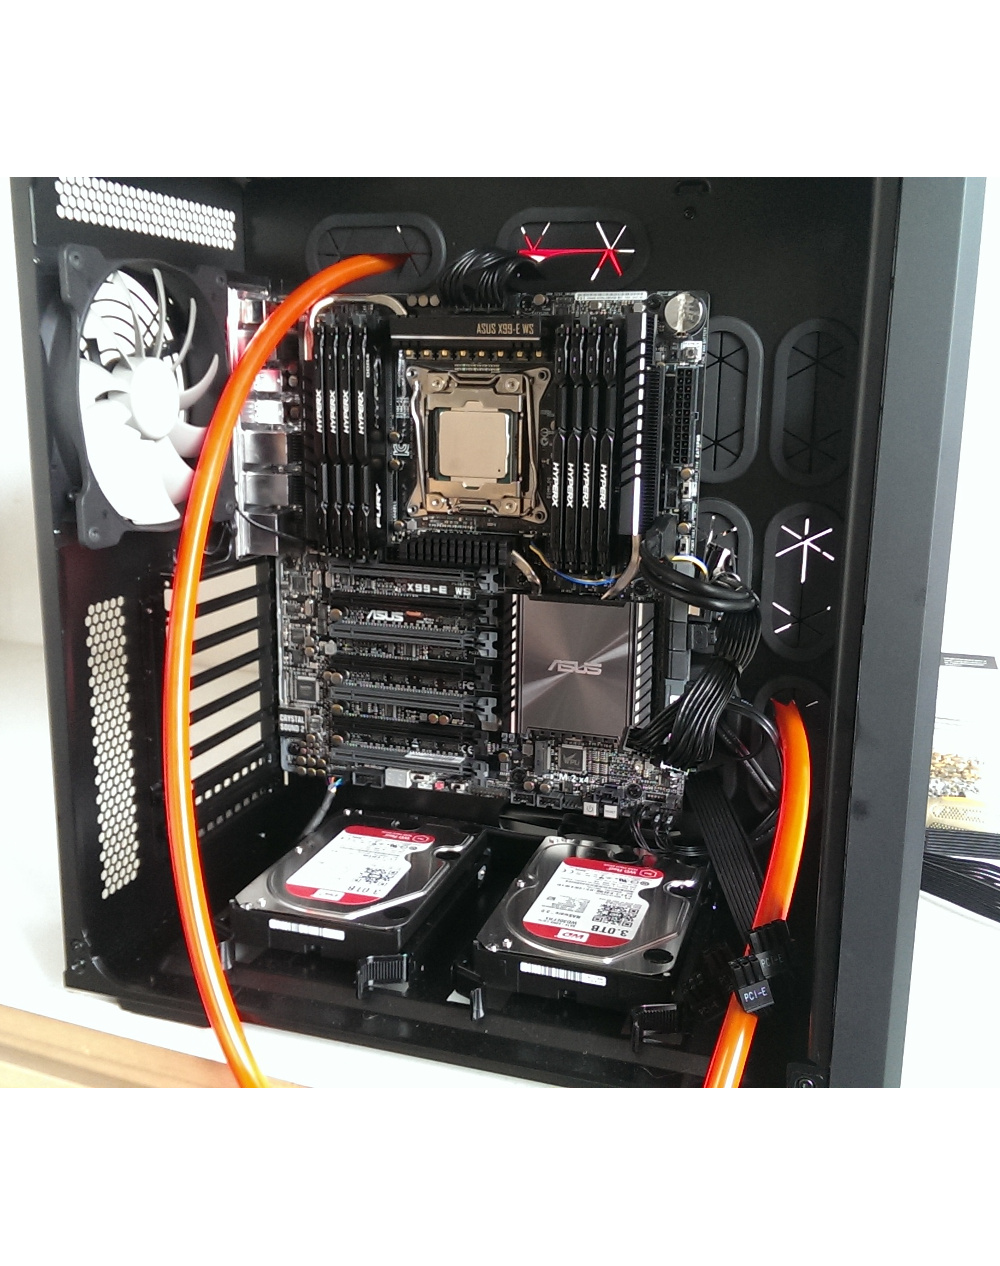
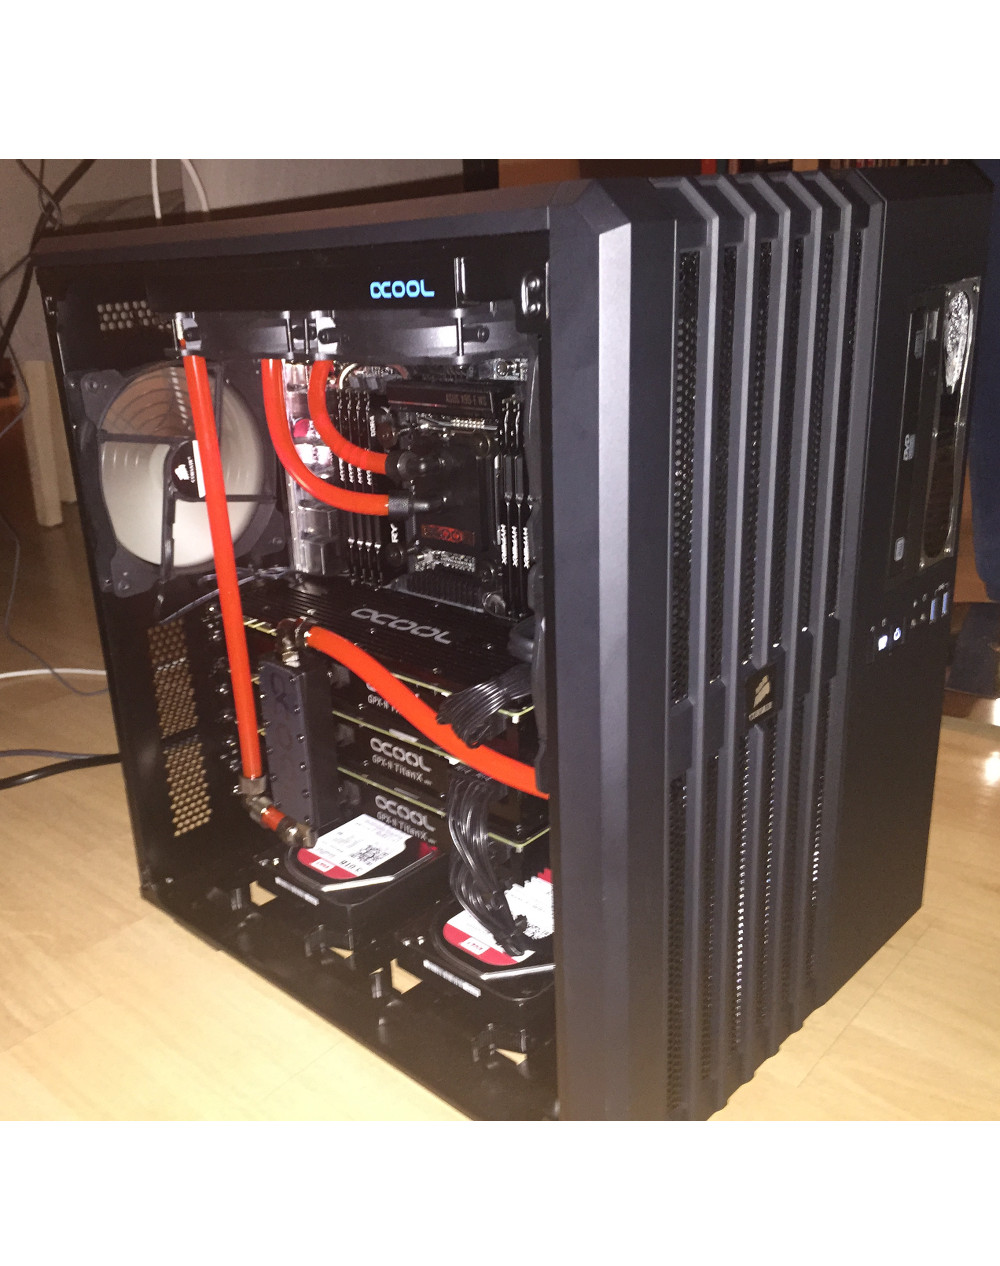
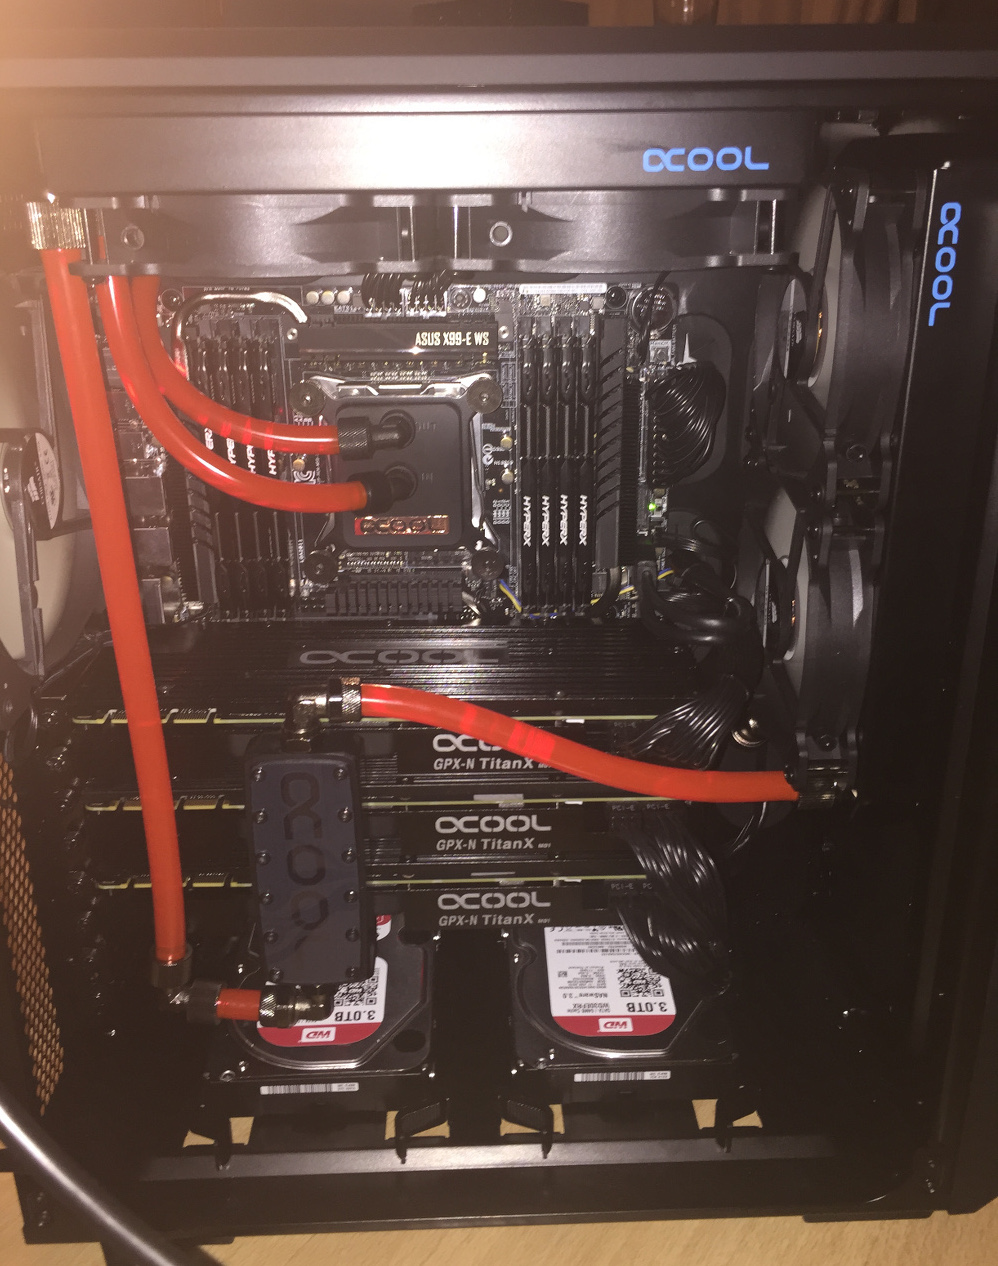
- Cooling: Custom (soft piped) Water Cooling for both the CPU and GPUs: a refilling hole drilled in the top of the chassis, and transparent reservoir in the front (see pictures below)


middle & right: The system is completely built. Notice that the water reservoir can be seen from the outside. Red plastic pipes can be seen going from up (there is a filling hole on the outside), down to the water pump, through the water blocks installed on the GPUs (keeping these cool). A similar thing happens for the CPU which has its separate cool block and pipes leading to and from it.
Building it yourself (DIY) or asking for help
Option A: DIY
If you have the time and willpower to build an entire system yourself, of course, this is the best way to fully understand how components work and which types of hardware fit well together. Also, you might better know what to do when a component fails, and can replace or repair it more easily.
Option B: Outside help
Another option is asking a specialized company to order the parts and build the entire system for you. The kinds of companies you want to be looking for is Gamer PC companies, which are used to custom build systems for gamers. They might even have experience with water cooled systems, although for gamer PCs one usually only water cools the CPU, and there are handy premade kits for that. This is, of course, different for full on water cooled systems where also multiple GPUs need to be screwed open, heatsinks placed on top, and the water piping, compressor caps, bits, and whatnot need to be all properly put together. The worst thing after all your hard work would be to have a water leak in your system, and damage to your GPU or other components.
Mainly because I couldn’t see myself properly put together all the necessary components for water cooling, as well as lack of time to read up on the full procedure, I opted for the second option, and found a very capable hardware builder to help me out with putting the first version of my Deep Learning Machine together. If you don’t mind having your PC built in the Netherlands, I can fully recommend computer-bestel.nl. You can see what they usually have in stock for high-end systems here, but you probably want to give a call or mail Johan Oosterhuis, computer-bestel’s founder. If you’re as crazy like me to go for a water cooled system take in mind that it’s rather fragile and therefore not recommended to ship it by ordinary parcel mail. A system like the one I have (let) build also will be too big to be counted as an “instrument” by airlines, so you can’t take it with you in the plane either, so transport might be something to think about before actually building your system.
Thats it for now. Next time (next week or so?) we’ll cover a lot of ground, installing CUDA support, and everything you need on a software level to get your bare metal system running some Deep Neural Nets!
